|
1) Prepare and separate hardware. Do not allow screws to get loose onto work surface as they will scratch the painted finish. |
|
|
2) Start with a side panel. The groove in the sides and back is for the bottom of the cabinet you must have these grooves aligned quite well to accommodate the bottom piece. You can place the bottom into the grooves at this time to align the side and back. |
|
| 3) The location of this corner brace will be below the bottom piece. |
|
|
4) These corner clip brackets click into place. Onceslid into placea last screw is installed into the middle hole to secure it in place. |
|
|
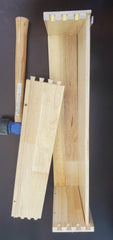
5) Dove tail joinery for drawers. A small amount of glue will insure stability of your drawers. |
|
|
6)_Glue and tap 3 sides into place, install the drawer bottom piece. Then spread two sides to receive the last piece to be tapped together. Screws are used at the front to keep strength where the drawer wear is greatest. |
|
|
7) A pair of drawer glides with the boots connected. The flat metal side goes to the outside with the plastic boot at the back panel of the cabinet. |
|
|
8) A drawer "boot" which receives the drawer glide. The glide will only go part way onto the boot. |
|
|
9) Drawer glides installed |
|
|
10) Extend (pull out) the drawer glides to receive the drawer. You will see a small hook that goes into the hole at the back of the drawer. |
|
|
11) Slide the glide out till the pin drops into the hole. |
|
|
12) You will see the height adjustment wheel at this location. |
|
|
13) You can now push the drawer in. It should perform the "soft close". |
|
|
14) This pin locks the drawer into the glide. |
|
|
15) The pin slid into place. |
|
|
16) Install hinges into door. Two short flat head screws per hinge into door and one into the hole in the face frame. Add bumpers to the door one each corner (2- one each right side of this image). |
|
| 17) Door ready to install. |
|
| 18) Install hinge with a single screw. Single door cabinet can have hinges attached either side. |
|
|
19) Door has been secured. Place the drawer front above the door. Drawer box should be installed inside the cabinet. Use a rigid material to space between door and drawer. You will hold the drawer front in place or clamp into place while attaching. |
|
|
20) Hold the drawer front in place or clamp while screwing together. |
|
| 21) Drawer front attached. |
|
| 22) Bottom side of drawer front. Drawer front requires four (4) screws. |
|
|
23) Toe kick can be glued, screwed and glued or installed with angle brackets. Toe kick skin should be used to cover this area spanning many cabinets. |
|
|
24) Toe kick has been glued on this cabinet with tape in place till cured. Do not place screws into the face of the toe kick if not using a toe kick skin. |
|
|
25) Two screws at backside secure cabinet back to bottom shelf. |
|
| 26) Bumpers installed onto door and drawer. |
|
| 27) Tiny screw secure drawer to glide one each side. |
|
| 28) Shelf installed with plastic clips. Clip points upward from hole. |
|
|
Finished Cabinet is ready for handles and installation. Be specially careful drilling handle holes. Place paper (painters) tape on the cabinet and mark hole locations with pencil or marker. |
|
Stock, Semi-Custom and Custom
|
Inset and Overlay Kitchen Cabinets