 833-377-8663

How to Assemble RTA Kitchen Cabinets: Step-by-Step Guide

Table of Contents
- How to Assemble RTA Kitchen Cabinets: Preparation and Workspace Setup
- Best Tools for RTA Cabinet Assembly
- Understanding RTA Cabinet Parts and Hardware
- Step-by-Step Assembly Instructions for Ready-to-Assemble Cabinets
- How Long Does It Take to Assemble Kitchen Cabinets
- Common Mistakes When Assembling RTA Cabinets
- RTA Cabinet Assembly Tips for Beginners
- Repairing Damaged RTA Cabinet Components
Last Updated: July 10, 2026
How to Assemble RTA Kitchen Cabinets: Preparation and Workspace Setup
Learning how to assemble RTA kitchen cabinets starts long before you pick up a power drill. The single biggest predictor of success is preparation. Ready-to-assemble cabinets arrive as flat-pack components that you must transform into functional cabinetry.
Choosing Your Assembly Location
Your workspace determines whether assembly feels manageable or chaotic. A garage, basement, or large dining room works better than a kitchen. For multiple cabinets, you'll need at least a 10-by-10-foot area. Lay cardboard or plywood across sawhorses to create a stable, protective work surface.
Lighting matters significantly. Position work lights or use natural daylight to see pre-drilled holes and align dowel pins correctly. Assemble in a climate-controlled space between 65-75°F if possible, as extreme temperatures affect wood glue and panel stability.
Organizing Components and Hardware
Before touching a single cabinet panel, unpack everything and organize it systematically. Sort all hardware by type: dowel pins in one pile, cam locks in another, shelf pins separate, drawer glides organized by size, hinges grouped together.
Lay out all cabinet panels for the first unit on your work surface. Identify which is the left side gable, right side gable, bottom panel, back panel, and any internal dividers. Most manufacturers label these on the back or edge. Check every component against the packing list and look for damage: dents, gouges, or warping in panels.
Best Tools for RTA Cabinet Assembly
Assembling ready-to-assemble kitchen cabinets doesn't require a professional workshop, but having the right tools makes the difference between a one-day project and a three-day ordeal.
Essential Power Tools and Hand Tools
A power drill is non-negotiable. You'll use it to drive screws, pre-drill pilot holes, and install hinges. A cordless drill with at least 18V power and a 1/2-inch chuck handles cabinet assembly easily.
A rubber mallet is your second most important tool. You'll use it to tap dowel pins into pre-drilled holes, seating them fully without splitting the wood. A 24-inch level ensures your cabinet carcass is truly square before you tighten everything.
A tape measure, pencil, and combination square help with layout and alignment. Wood glue (Titebond III is the standard) is essential for joints that will bear weight. A clamp or two (bar clamps or pipe clamps) hold cabinet panels square while glue dries. Two 24-inch clamps are sufficient for most cabinet boxes.
Tool Alternatives for Renters and Budget DIYers
If you don't own power tools, borrowing or renting is cheaper than buying. Home Depot and Lowe's rent cordless drills for $10-15 per day. A rubber mallet, level, and tape measure are affordable enough to buy, under $50 total for basic versions. Hand-driving screws takes longer but works if you have patience. For clamping, you can use bar clamps, C-clamps, or even heavy books and weights to hold panels square while glue dries.
Understanding RTA Cabinet Parts and Hardware
Every RTA cabinet box contains the same core components, though configurations vary. Understanding what each part does prevents confusion during assembly.
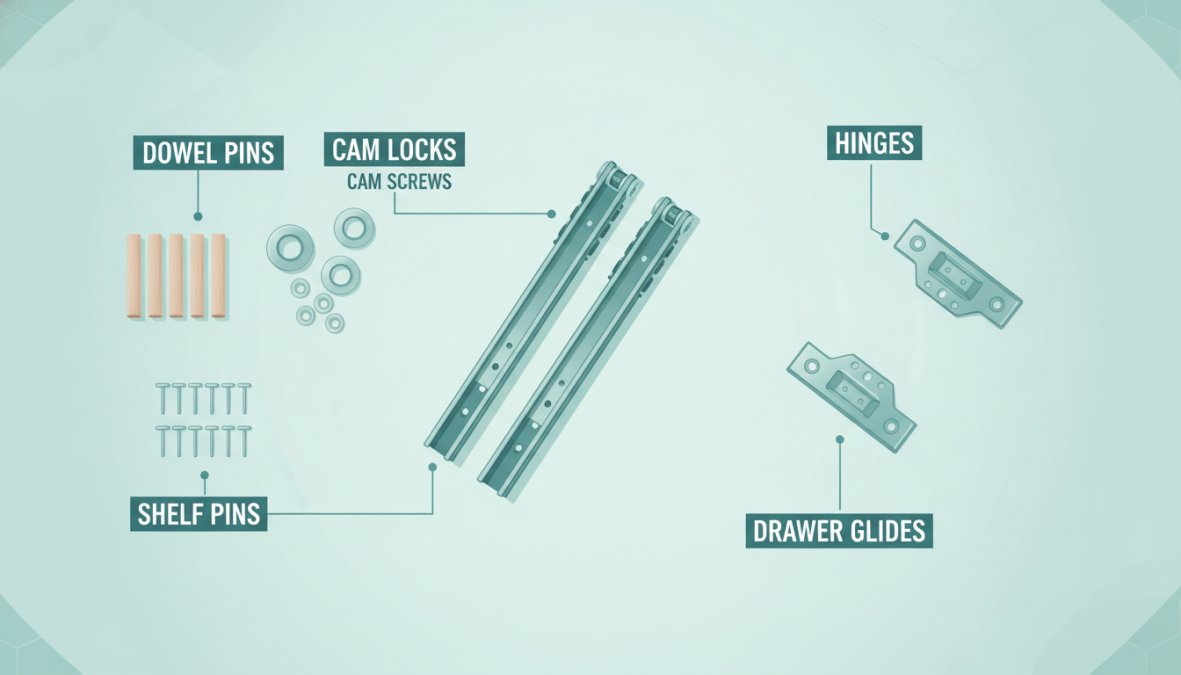
Cabinet Box Components and Dowel Pins
The cabinet carcass is the box itself: left side gable, right side gable, bottom panel, top panel (if included), and back panel. These are typically made from plywood or particleboard with a veneer or laminate finish.
Pre-drilled holes run along the interior edges of side gables. These holes accept dowel pins, wooden or plastic cylindrical fasteners that align panels and create mechanical joints. Cam locks are plastic or metal fasteners that tighten the joint. The cam lock bolt threads into a threaded insert on one panel; the cam (a rotating lobe) tightens against the dowel pin and panel edge, pulling everything snug.
The back panel is typically thin plywood or hardboard. It's glued and stapled to the back edges of the cabinet box, providing racking resistance and keeping the box square. Shelf pins support adjustable shelves, inserting into holes drilled on the interior side walls.
Drawer Glides, Hinges, and Cam Locks
Drawer glides (also called slides) are metal tracks that allow drawers to open and close smoothly. Most RTA cabinets use ball-bearing side-mount glides, tracks mounted to the interior sides of the cabinet box. Side-mount glides come in pairs (left and right) and are matched to the drawer depth. Installing glides incorrectly causes drawers to bind or tilt when opening.
Hinges attach cabinet doors to the cabinet box. Most RTA cabinets use cup hinges (also called Eurohinges), a hinge cup mortised into the back of the door, with a hinge arm bolted to the interior side wall. Cup hinges allow three-way adjustment: in/out (depth), left/right (side-to-side), and up/down (height).
Step-by-Step Assembly Instructions for Ready-to-Assemble Cabinets
Assembly follows a logical sequence: build the box, install shelves, attach the face frame and back panel, install drawer glides, then hang doors.
Building the Cabinet Carcass
Start with the side panels (gables) laid flat on your work surface, interior-facing up. Position the bottom panel between the two side panels, aligning the dowel pin holes. Insert dowel pins into the holes on one side panel first, then slide the bottom panel onto those pins.
Apply wood glue around the dowel pin holes before inserting pins. Once the bottom panel is positioned, insert dowel pins into the holes on the opposite side panel. Install cam locks on all dowel pin joints. Hand-tighten them first, then use the cam lock wrench to snug them down. Tighten in a cross pattern to pull the joint evenly.
Check squareness by measuring diagonally from corner to corner. Both diagonals should be equal length. If they're different, the cabinet is racked. Loosen cam locks, adjust the panel position slightly, and re-tighten. Use a level to check that the bottom panel is truly horizontal.
Installing Shelves and Shelf Pins
Once the cabinet carcass is square and tight, install shelf pins. Determine the shelf height based on what you're storing. Insert shelf pins into the holes; they should sit flush with the interior surface. Lay the shelf on the pins and check that it's level. For adjustable shelves, install pins at multiple heights so you can move shelves later.
Attaching the Face Frame and Back Panel
Position the face frame on the front of the cabinet carcass. Check that it's square and aligned with the edges. Clamp it in place, then drive screws through pre-drilled holes into the cabinet box.
Apply wood glue to the back edges of the side panels and bottom panel. Position the back panel and staple it in place using a pneumatic stapler (1/2-inch staples, spaced 4-6 inches apart).
Installing Drawer Boxes and Glides
Mount the cabinet-side glides to the interior sides of the cabinet box, aligned with the pre-drilled holes. Use the screws provided; typically, two screws per glide, one at the front and one at the rear. Ensure the glides are level and parallel.
Attach the drawer-side glides to the drawer box, also using provided screws. Align them carefully, they must be parallel to the cabinet-side glides. Slide the drawer into the cabinet, engaging the drawer-side glides with the cabinet-side glides. The drawer should slide smoothly and fully extend without tilting.
Hinge Attachment and Door Alignment
Install hinge mounting plates on the interior side walls of the cabinet box. Bolt the plates in place using the hardware included. Ensure plates are at the correct height, typically one hinge near the top and one near the bottom of the door.
Attach the door to the hinges. Close the door and check alignment. The door should be flush with the face frame on all sides, with an even 1/8-inch gap around the perimeter. If the door is misaligned, adjust the hinge screws:
- In/out adjustment: Screw on the hinge arm moves the door forward or backward
- Left/right adjustment: Side screw moves the door side-to-side
- Up/down adjustment: Vertical screw moves the door up or down
Make small adjustments, a quarter-turn of the screw produces noticeable movement. Repeat until the door is perfectly aligned.
How Long Does It Take to Assemble Kitchen Cabinets
Assembly time depends on your experience level, the number of cabinets, and whether you're installing them or just assembling the boxes. A single base cabinet takes 45 minutes to an hour for a first-timer. A wall cabinet takes 30-45 minutes. If you're assembling a full kitchen (12-15 cabinets), expect 12-16 hours spread over two to three days.
Experienced assemblers work faster, 30 minutes per cabinet, because they've developed a rhythm. Installation (mounting cabinets to walls and ensuring they're level, plumb, and aligned) adds another 2-4 hours depending on wall condition and kitchen layout.
Common Mistakes When Assembling RTA Cabinets
Most assembly failures stem from a handful of preventable errors.
Skipping the Schematic Drawings and Instructions
The schematic drawings included with your cabinets are essential. These diagrams show which panel is which, where dowel pins go, and how components fit together. Spend five minutes reviewing the schematic before touching a single piece. Identify all components and verify they match the drawings.
Neglecting Squareness and Structural Integrity
A cabinet box that's not square will cause doors to bind, drawers to stick, and shelves to tilt. Checking squareness takes two minutes, measure diagonals and compare. If measurements differ by more than 1/4 inch, the cabinet is racked. Fix it immediately by loosening cam locks, adjusting panel positions, and re-tightening.
Improper Wood Glue Application and Dowel Insertion
Wood glue only works if it's present at the joint. Many assemblers skip glue entirely, relying solely on cam locks. This is a mistake. Apply a thin bead of glue around the dowel pin holes before inserting pins. Dowel pins must be inserted straight and fully seated using a rubber mallet with gentle, controlled taps.
RTA Cabinet Assembly Tips for Beginners
These tips come from thousands of assembly projects.
Pre-Assembly Inspection and Pilot Holes
Inspect every component before assembly. Look for damage, warping, or missing hardware. Check that pre-drilled holes are clean and free of debris. Verify that pre-drilled holes align correctly. Misaligned holes are the most common cause of assembly problems.
Using a Rubber Mallet and Mounting Hardware Correctly
A rubber mallet distributes force evenly when tapping dowel pins into place. Use gentle, controlled taps, two or three usually seats a pin completely. Mounting hardware (hinges, glides, mounting plates) must be installed precisely. Verify alignment before driving screws.
Post-Assembly Quality Control Checklist
Before considering assembly complete, verify these items:
| Check | What to Verify | Impact if Failed |
|---|---|---|
| Squareness | Diagonal measurements equal | Doors bind, shelves tilt |
| Cam lock tightness | No wobble or movement | Cabinet creaks, joints fail |
| Back panel | Stapled securely, flush edges | Racking under load |
| Shelf pins | Level, aligned on both sides | Shelves tilt or collapse |
| Drawer glides | Level, parallel, smooth operation | Drawers stick or tilt |
| Hinge alignment | Door flush with frame, even gaps | Doors bind or won't close |
| Face frame | Flush with cabinet edges, no gaps | Appearance issues, uneven doors |
Open and close doors and drawers 10 times each. They should operate smoothly without binding or wobbling.
Repairing Damaged RTA Cabinet Components
Damage happens. A dent in a panel, a cracked shelf, or a stripped dowel hole can often be repaired without replacing the entire component.
Minor dents in veneer or laminate are cosmetic only. Wood filler colored to match the cabinet finish can minimize visibility. Cracks in solid wood panels can be filled with wood filler or epoxy if small (less than 1/8 inch wide). For larger cracks, replacement is safer.
Stripped screw holes in wood panels can be repaired by filling the hole with a wooden toothpick or dowel dipped in wood glue. Once dry, drill a new pilot hole adjacent to the original and re-drive the screw. Bent or damaged drawer glides can sometimes be straightened if the damage is minor. More often, replacement is necessary. Glides are inexpensive, usually $15-30 per pair.
Assembling RTA kitchen cabinets is manageable for any homeowner willing to follow a logical sequence and check their work carefully. The process rewards attention to detail: square cabinets, tight joints, and properly aligned doors and drawers result from methodical assembly and verification.
If you're looking to upgrade your kitchen with quality RTA cabinetry, consider options like Custom Order Inset or [Special Order Oak Inset Kitchen Cabinets](https://rtawholesalers.com/collections/white-oak-inset-shaker-kitchen-cabinets-special-order), which offer straightforward assembly and professional results. RTA Wholesalers provides ready-to-assemble cabinetry in custom sizes and colors with quality construction designed for the assembly process outlined in this guide. Our inset cabinets are available in multiple wood species and stain colors, plus unlimited Sherwin Williams paint options. With our free kitchen design service and wholesale pricing on custom orders, you can achieve a professional kitchen renovation without the premium cost of semi-custom or fully custom cabinets.
Frequently Asked Questions
What tools do I need to assemble RTA kitchen cabinets?
Essential tools include a power drill with bits, a rubber mallet, a level, a tape measure, a square, and a screwdriver set. Pre-drilled holes in RTA cabinet panels simplify the process significantly. For budget-conscious DIYers, a manual hand drill and basic hand tools can substitute for power tools, though assembly takes longer. A drill press or pocket hole jig helps achieve pilot holes with greater precision, improving structural integrity and door alignment.
How long does it take to assemble RTA cabinets?
Assembly time varies based on experience and cabinet complexity. A single base or wall cabinet typically takes 1-3 hours for beginners, while experienced assemblers complete one in 30-60 minutes. A full kitchen of 10-15 cabinets may require 15-30 hours total. Factors affecting timeline include familiarity with schematic drawings, tool proficiency, and whether you're installing drawer glides and hinges simultaneously. Planning extra time for hinge adjustment and door alignment ensures better results.
What are the most common mistakes when assembling RTA cabinets?
Common errors include ignoring schematic drawings, skipping the squareness check during cabinet box assembly, applying insufficient wood glue before dowel insertion, and over-tightening cam locks. Many DIYers rush hinge attachment and door alignment, resulting in uneven gaps. Failing to use pilot holes can split cabinet panels. Not inspecting components for damage before assembly wastes time later. Taking your time with each step and double-checking measurements prevents costly rework and ensures professional results.
Do I need wood glue to assemble RTA cabinets?
While many RTA cabinets rely primarily on dowel pins and cam locks for structural integrity, applying wood glue to dowel holes before insertion significantly strengthens joints and improves long-term durability. Wood glue is especially recommended for base cabinets that bear weight and for custom inset cabinetry where premium quality is expected. Always follow manufacturer instructions, as some cabinet systems are designed for glue-free assembly. When used, allow adequate drying time before moving or installing the cabinet box.


