 833-377-8663

How to Design a Functional Kitchen Layout: A Step-by-Step Guide

Table of Contents
- Understanding the Kitchen Work Triangle Rules
- How to Design a Functional Kitchen Layout: Core Principles
- Kitchen Layout Clearance Guidelines for Safe, Efficient Spaces
- Best Kitchen Cabinet Configurations for Your Layout
- Small Kitchen Space Planning: Maximizing Limited Layouts
- Common Layout Types: L-Shaped, U-Shaped, and Galley Kitchens
- Lighting, Ventilation, and Functional Design Elements
- Accessibility and Universal Design Considerations
How to Design a Functional Kitchen Layout: A Step-by-Step Guide
Last Updated: August 4, 2026
When planning a kitchen renovation, the layout decision shapes everything that follows: your workflow, budget, and daily experience. Start with a correct kitchen design with proper wall and window measurements to ensure correctness. Understanding how to design a functional kitchen layout is the foundation of a successful remodel. At RTA Wholesalers, we've helped homeowners and contractors get this right the first time. The difference between a frustrating kitchen and one you love often comes down to understanding spacing, zones, and traffic flow.
Understanding the Kitchen Work Triangle Rules
The work triangle is the foundational principle in kitchen design. The three vertices are your sink, stove, and refrigerator, the three zones where most cooking activity happens. These points should form a triangle with sides between 4 and 9 feet each, ideally totaling 26 feet or less around the perimeter.
When these stations are too far apart, you waste steps and energy. When they're too close, you create congestion and safety issues. A properly balanced work triangle minimizes unnecessary movement while keeping zones accessible without interference.
Modern kitchens have complicated this principle. Open-concept layouts, kitchen islands, and multi-cook households mean the traditional triangle doesn't always apply. The principle still holds, minimize distance between your most-used stations, but apply it flexibly to your actual cooking patterns.
How to Design a Functional Kitchen Layout: Core Principles
Designing a functional kitchen layout requires balancing three competing demands: workflow efficiency, safety, and physical constraints.
Kitchen Zones and Workflow Optimization
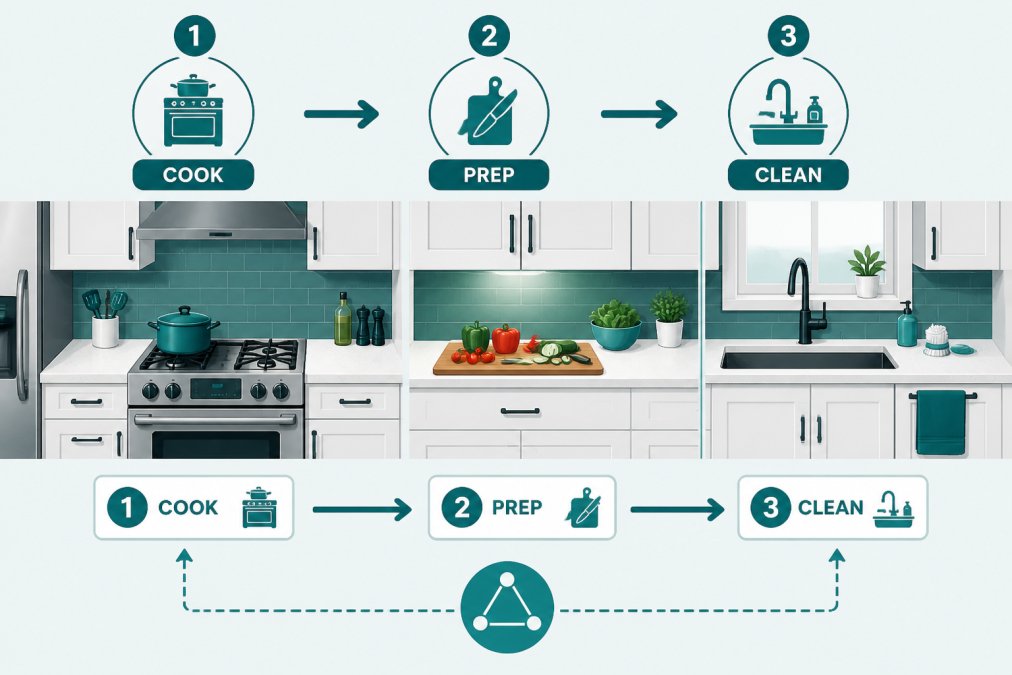
Think of your kitchen as three overlapping zones: the prep zone (where you chop and assemble ingredients), the cooking zone (where heat and active cooking happen), and the cleanup zone (where dishes are washed and stored). These zones should flow logically so you're not crossing paths or reaching across active cooking surfaces.
The prep zone centers on your main counter space, ideally positioned between the refrigerator and sink with a minimum of 24 inches of counter space on each side of the sink.
The cooking zone revolves around your stove and oven. Safety is critical here, you don't want foot traffic passing directly behind someone cooking. Counter space to the sides of the stove (at least 18 inches on each side) provides landing space for pots, pans, and hot dishes.
The cleanup zone includes the sink, dishwasher, and trash within a few steps of each other, with at least 24 inches of counter space on the drain side of the sink. Be sure to ensure the trash can cabinet opening does not interfere with the dishwasher opening space. These two items are often opened at the same time and should not encroach on each other.
When these three zones are arranged in a logical sequence, refrigerator to prep counter to stove to sink, your workflow becomes intuitive.
Traffic Flow and Clearance Spacing
Beyond the three work zones, consider how people move through the kitchen. The main traffic path should not cut directly through your work zones. Ideally, traffic flows around the perimeter or through a designated corridor.
If your kitchen has a doorway leading to the dining room or living area, position your work zones away from that traffic line. A common mistake is placing the refrigerator directly in line with a doorway, which means people constantly interrupt the cook while accessing the fridge.
In galley kitchens, ensure adequate clearance so two people can pass each other without bumping into open appliance doors or someone working at the counter.
Kitchen Layout Clearance Guidelines for Safe, Efficient Spaces
Clearance measurements are not optional, they're the difference between a kitchen that works and one that feels cramped or unsafe. The National Kitchen & Bath Association (NKBA) provides guidelines based on decades of ergonomic research.
Standard Walkway and Aisle Widths
The main work aisle in your kitchen should be a minimum of 42 inches wide if you have the space. This allows one person to work comfortably while another passes behind them. If two people regularly cook together, aim for 48 inches. In a galley kitchen with work surfaces on both sides, each aisle should be at least 42 inches. Smaller homes may have only 36 or 30 inches of clear walk space. Only go under 30 inches if there is an alternate rout to the destination.
Traffic aisles (pathways that don't involve active cooking) can be narrower at 36 inches minimum. Anything less than 36 inches starts to feel cramped. These measurements are taken from the face of cabinets or appliances.
Landing Space and Counter Clearance
The refrigerator should have at least 15 inches of counter space on the handle side for setting down groceries.
The cooktop or range needs at least 18 inches of landing space on both sides (or 24 inches on one side if space is limited).
The sink needs at least 24 inches of counter on the drain side for setting down clean or dirty dishes.
Best Kitchen Cabinet Configurations for Your Layout
Your cabinet choice is integral to how your kitchen layout functions. Cabinet style, depth, and configuration directly impact workflow and usability.
Inset vs. Overlay Cabinet Options
Inset cabinets sit flush within the face frame, creating a refined, built-in appearance. Overlay cabinets mount on top of the face frame, standing slightly proud of the frame edge. Inset cabinets offer a higher-end aesthetic and slightly more usable interior space. Overlay cabinets are more forgiving during installation and offer flexibility for future modifications.
Inset has a distinct advantage over overlay cabinets since they do not require fillers at inside corners or against walls. Overlay cabinets REQUIRE fillers at inside corners to ensure the drawers can open without hitting the opposing drawer handle.
When you need cabinets that fit your exact dimensions and color scheme, Custom Order Inset and Custom Color Inset options eliminate the frustration of forcing stock sizes into an imperfect space. RTA Wholesalers offers Inset cabinets that are top quality and available in custom sizes and custom colors at great wholesale pricing.
Storage Efficiency and Appliance Positioning
Position appliances based on your workflow rather than treating them as fixed points. Positioning the dishwasher immediately adjacent to the sink (ideally on the drain side) simplifies cleanup. You rinse at the sink and load directly into the dishwasher without extra steps.
Upper cabinets above the sink and stove are typically shallower (12 inches instead of the standard 15 inches) to accommodate a window or better sightlines. This trade-off sacrifices storage to gain visibility and natural light, which makes the space feel larger.
Small Kitchen Space Planning: Maximizing Limited Layouts
Small kitchens require ruthless prioritization. They are more difficult to layout than a larger kitchen which affords you much levity on placement of most any items. A smaller kitchen usually has predetermined placement that cannot be relocated. The work triangle principle becomes even more important, keep your sink, stove, and refrigerator close together (ideally within a 15-foot perimeter) so you're not constantly walking across the space.
Vertical storage with tall cabinets that reach the ceiling maximizes limited floor space. Consider a mix of closed storage for everyday items and open shelving for attractive items you actually use.
An island is tempting in a small kitchen because it adds counter and storage space. However, keep it compact (24-30 inches deep, 3-4 feet long) to avoid consuming walkway space and making the kitchen feel cramped. The larger you can make an island the better. Be careful with going beyond five feet in width to make handing items across the island possible.
Bright task lighting at the sink and stove, combined with ambient lighting, makes the space feel larger and more functional.
Common Layout Types: L-Shaped, U-Shaped, and Galley Kitchens
Most residential kitchens fall into one of three primary layout types. Understanding the strengths and limitations of each helps you design the best layout for your space.
L-Shaped Kitchens
An L-shaped layout positions cabinets and appliances along two perpendicular walls, leaving the other two sides open. This is the most common layout in residential kitchens because it's flexible and works well in open-concept spaces.
The L-shape naturally creates two work zones that don't interfere with each other. One wall typically houses the sink and refrigerator, while the other positions the stove. This separation reduces congestion and allows two people to cook without bumping into each other.
The image below shows the typical inside corner which will require fillers to prevent drawers from hitting the opposing cabinet handle.
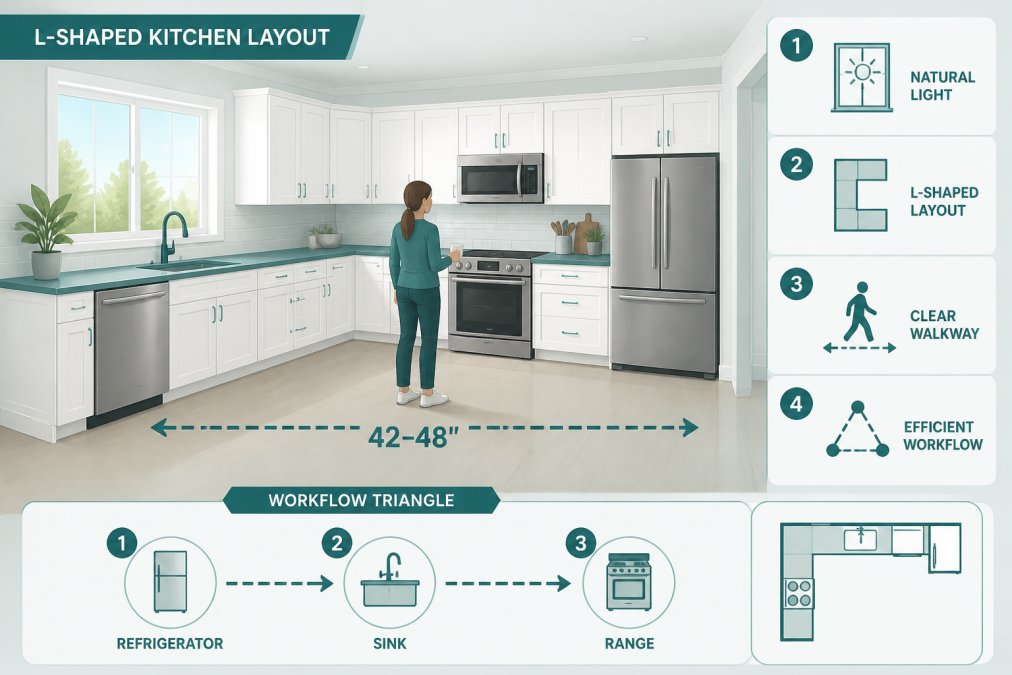
The open sides are ideal for a kitchen island or breakfast bar, which adds counter space and storage without making the kitchen feel enclosed. The main limitation is that one corner is often underutilized. The corner cabinet where the two walls meet is notoriously difficult to access, though blind corner cabinets with pull-out organizers can help.
U-Shaped Kitchens
A U-shaped layout positions cabinets and appliances along three walls, creating a horseshoe configuration. This layout maximizes storage and counter space, making it ideal for large kitchens or households that cook frequently.
The U-shape creates three distinct work zones, one on each wall, which allows multiple people to cook simultaneously without interfering with each other. However, a U-shaped kitchen can feel enclosed if the walls are too close together. Each leg of the U should have at least 42 inches of clear space. A U-shaped kitchen also has two corner cabinets instead of one, which requires careful planning with pull-out organizers or lazy susans. You may elect to permanently close the corner and make usable cabinet without regard for loss of storage space.
Galley Kitchens
A galley layout positions cabinets and appliances along two opposite walls, creating a narrow, corridor-like space. This layout is common in apartments, smaller homes, and homes where the kitchen is not the primary entertaining space.
The strength of a galley kitchen is efficiency, everything is within arm's reach and the layout forces a logical workflow. The limitation is that two people can't comfortably cook together when the kitchen width is too narrow. Galley kitchens work best for single cooks or couples who don't cook simultaneously.
Clearance is critical in a galley kitchen. Each side should be at least 42 inches wide. If your galley is narrower, it will feel cramped.
Lighting, Ventilation, and Functional Design Elements
A functional kitchen layout isn't just about appliance placement. Lighting and ventilation are equally important to how the space actually works.
Task lighting at the sink, stove, and prep areas is essential. Under-cabinet lighting illuminates the countertop where you're actually working, eliminating shadows and making food prep safer. Pendant lights above an island provide both task lighting and ambient light.
Layered lighting, combining task, ambient, and accent lighting, creates a kitchen that's both functional and pleasant. A kitchen with only overhead lighting feels institutional.
Ventilation is often overlooked in layout planning, but it's critical to functionality and comfort. Your range hood should be positioned directly above the stove and sized appropriately for your cooking style. Most residential kitchens benefit from a hood rated for 300-400 CFM (cubic feet per minute). The hood should vent to the outside, not recirculate air back into the kitchen.
Accessibility and Universal Design Considerations
A functional kitchen layout should accommodate people of different ages, abilities, and heights. Universal design principles don't require specialized equipment, they're about thoughtful spacing and positioning that works for everyone. The most important consideration is that the kitchen layout is right for you.
Counter height is typically 36 inches, which is comfortable for average-height adults. However, consider varying counter heights if someone in your household is significantly taller or shorter, or if mobility is a concern. A 30-inch counter accommodates wheelchair users and shorter adults.
Appliance placement should consider reach. Frequently accessed items and everyday dishes should be within a 24-48 inch reach zone. Knee space under the sink (27-inch clearance) is valuable for people using a wheelchair or those who prefer to sit while working.
Door swings matter. Cabinet doors and appliance doors should open fully without blocking walkways or other appliances. Lighting should be bright enough that people with vision changes can work comfortably, and contrast between countertops and backsplashes helps people distinguish work surfaces.
Consider a full height cabinet between a wall and your fridge to make the doors open clearly without hitting the wall.
Designing a functional kitchen layout requires balancing workflow efficiency, safety, and your specific needs. The principles, work triangle, clearance spacing, logical zones, and thoughtful appliance positioning, apply across all kitchen types and sizes. When you're ready to implement your design with actual cabinetry, RTA Wholesalers offers Inset cabinets that are top quality and available in custom sizes and custom colors at great wholesale pricing. Our free kitchen design service helps you catch mistakes before you order, ensuring your layout works perfectly with your cabinet selection.
Frequently Asked Questions
What is the golden triangle rule in kitchen design, and how does it apply to my layout?
The kitchen work triangle connects three primary zones: the sink, stove, and refrigerator. The total distance between these three points should ideally be between 15 and 26 feet, with no single leg exceeding 9 feet. This spacing minimizes unnecessary movement during meal preparation and cleaning, reducing fatigue and improving workflow efficiency. A properly balanced triangle ensures you spend less time traveling between zones.
What are the standard clearance requirements for kitchen walkways and workspace?
Main walkways require a minimum of 36 inches of clearance, though 42 inches is preferable for comfortable movement. Work aisles between counters or islands need at least 42 inches minimum. Counter depth is typically 24 inches, and you should maintain 15 to 18 inches of clear space on either side of a sink or cooktop for safe food prep and cooking. Island spacing should allow at least 36 to 42 inches on all sides for traffic flow.
How do I choose between inset and overlay cabinet configurations for my kitchen?
Inset cabinets have doors and drawers that sit flush within the cabinet frame, creating a refined, built-in appearance and offering superior durability and customization. Overlay cabinets have doors that overlap the frame edges, providing a more contemporary look and slightly more interior storage space. Inset cabinets work best for traditional or high-end designs and are available in custom sizes and colors at wholesale pricing, while overlay cabinets suit modern kitchens and offer faster lead times for standard configurations.
What layout works best for small kitchens with limited space?
Galley kitchens maximize efficiency in tight spaces by arranging cabinets and appliances along two parallel walls, creating a compact work zone. Single-wall layouts use one wall for all elements and work for very small kitchens or open-concept homes. L-shaped layouts add flexibility by using two perpendicular walls. The key is maintaining the work triangle while respecting clearance minimums. Vertical storage, corner cabinets, and islands (if space allows) help small kitchens function without feeling cramped.


