 833-377-8663

How to Install Base Kitchen Cabinets: Step-by-Step

Table of Contents
- Tools Needed for Cabinet Installation
- How to Level Base Cabinets on Uneven Floors
- Fastening Base Cabinets to Wall Studs
- How Long Does It Take to Install Kitchen Cabinets?
- Troubleshooting Common Installation Errors
- Cabinet Hardware and Fastener Selection
- Conclusion
- Frequently Asked Questions
Last Updated: September 23, 2026
Tools Needed for Cabinet Installation
Knowing how to install base kitchen cabinets starts with the right tool kit, not brute force. A level, a stud finder, and a drill do most of the heavy lifting, and the rest of the list is small.
Here is what you actually need on site:
- Measuring tape and a pencil for layout marks
- Stud finder to locate wall studs behind drywall
- 4-foot level and a laser level for long runs
- Drill/driver with a clutch and a bit set
- Cabinet screws (2-1/2 to 3 inch) and wood shims
- Clamps for pulling cabinet boxes tight
- Pry bar for fine height adjustment
- Stud finder, chalk line, and a square for corner checks
- Safety glasses and a shop vac
How to Level Base Cabinets on Uneven Floors
Level base cabinets by finding the highest point of the floor first, then shimming every other cabinet up to match it. Never try to lower a cabinet to meet a low spot. You build up, not down. That single rule prevents 90 percent of the alignment problems that show up later at the doors and drawer fronts.
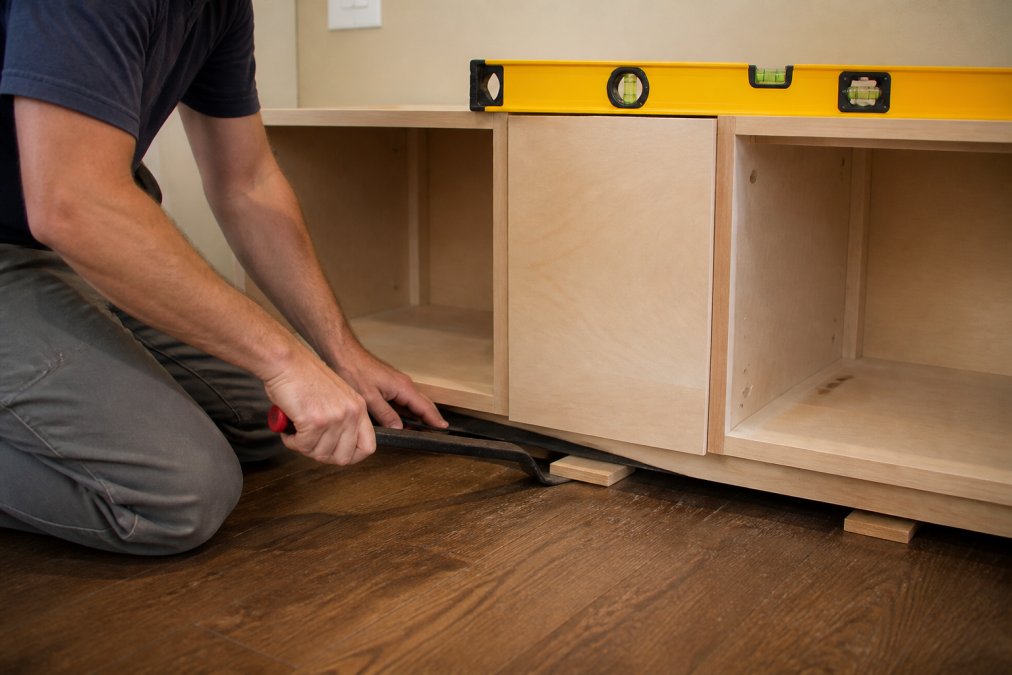
Here is the process:
- Slide a 4-foot level across the floor in several directions to find the high spot in your run. Mark it with painter's tape.
- Set your first cabinet at that high point. This becomes your reference cabinet, and every other box in the run gets shimmed up to its top edge.
- Slide composite shims under the low corners until the cabinet box reads level front-to-back and side-to-side. Tap them in pairs, back-to-back, so they lock against each other.
- Check level on top of the cabinet box, not the floor. The floor lies. The box doesn't.
- Snug shims by scoring them with a utility knife and snapping off the excess flush with the cabinet side.
How much floor slope is too much
A common tolerance in the trade is 1/4 inch of slope per 10 feet of run. Anything under that, shims handle it. Anything over that, and you have three options:
- Shim harder and hide the gap with toe kick. The toe kick is 4 inches tall on most base cabinets, so you can bury a surprising amount of shim stack behind it. This is the fastest fix and the one most installers reach for first.
- Build a leveling platform. Rip 2x4 sleepers to match the slope, anchor them to the floor, and set the cabinets on top. This is the right call when the slope runs the length of the kitchen and shimming every box would leave a visible wedge at the toe kick.
- Fix the floor first. If the slope is structural, a sagging joist, a settled pier, no amount of shimming will hold. Address the floor before the cabinets go in.
Leveling a run, not a box
Once your reference cabinet is set, clamp the next box to it and check level across both. Shim the second box to match the first, not to match the floor. Repeat down the run. The goal is a single flat plane across every cabinet top, because that plane is what the countertop sits on. A countertop fabricator will reject a run that's out of plane by more than 1/8 inch over 10 feet, and they'll charge you to come back.
Fastening Base Cabinets to Wall Studs
Fasten base cabinets to wall studs by driving 2-1/2 inch cabinet screws through the hanging rail at the back of the box into each stud. Skip the drywall anchors. Cabinets carry real weight, and only studs hold it.
Steps for a solid fasten:
- Mark stud centers on the wall with a stud finder.
- Drill pilot holes through the cabinet's rear rail at those marks.
- Drive screws with a clutch set low enough to sink the head without crushing the rail.
- Add a second screw 2 inches below the first for tall or heavy cabinets.
- Check for plumb before moving to the next box.
How Long Does It Take to Install Kitchen Cabinets?
Learning how to install base kitchen cabinets takes most DIYers 4 to 8 hours for a standard 10-foot run. A pro crew does the same job in 2 to 4 hours. The gap comes down to prep, not speed.
Here's a rough breakdown for a first-timer:
| Task | Time |
|---|---|
| Layout and stud finding | 45 min |
| Leveling and shimming | 1 to 2 hours |
| Clamping and fastening | 1 to 2 hours |
| Filler strips and toe kick | 45 min |
| Door and drawer adjustment | 30 to 60 min |
Troubleshooting Common Installation Errors
Most installation problems trace back to one of four causes: a bad reference point, no shims, over-tightened screws, or a wall that isn't square. Here's how to spot and fix each.
24", 27", 30", 33 & 36"42" Wide Base →
Cabinet Hardware and Fastener Selection
Fastener choice decides whether your cabinets stay put. The right screw for a base cabinet is a cabinet screw: a 2-1/2 inch, coarse-thread screw with a washer head and a self-countersinking nib. The washer head spreads load across the cabinet rail instead of pulling through it, and the nib cuts a clean countersink so the head sits flush without crushing the wood.
Here's what to use where:
- Cabinet to wall stud: 2-1/2 inch cabinet screws, one per stud minimum, two per stud on tall or heavy boxes
- Cabinet to cabinet (face frame): 1-1/4 inch screws, pre-drilled, driven through the face frame stiles
- Cabinet to cabinet (box sides): 1-1/2 inch screws, pre-drilled to avoid splitting plywood
- Toe kick and filler strips: 1-1/4 inch finish screws
- Drawer slides and hinges: hardware kit screws, never substitutes
Matching the fastener to the wall substrate
Most guides assume wood studs behind drywall. That's not always what you find.
- Wood studs: 2-1/2 inch cabinet screws are the standard. Drive into the center of the stud, not the edge.
- Metal studs: Use self-drilling screws rated for steel studs, and add a horizontal cleat screwed across at least three studs. Metal studs flex under load, and a cleat spreads the weight.
- Masonry or concrete: Use a hammer drill to set sleeve anchors or tapcons into the wall, then fasten the cabinet rail to those. Cabinet screws alone won't hold in masonry.
- Plaster and lath over studs: The plaster layer can be 3/4 inch thick. Use 3-inch screws so you actually reach the stud, and pre-drill through the plaster to avoid cracking it.
Cutting around plumbing and electrical
This is the step most guides skip, and it's where DIYers get into trouble. Before you fasten anything, look inside the wall cavity where the cabinet will sit.
- Plumbing: Under-sink cabinets need a hole for the drain trap, the supply lines, and often a dishwasher line. Cut the hole in the cabinet back with a hole saw or jigsaw, then dry-fit the cabinet before fastening. Leave a service gap of at least 2 inches around each pipe so you can work on the connection later without pulling the cabinet.
- Electrical: If an outlet or switch box sits behind the cabinet, cut a precise opening in the cabinet back and bring the box forward into the cabinet interior. Never bury a junction box behind a cabinet, it has to remain accessible.
- Disposal and dishwasher: Plan the layout around these connections before you fasten anything. The disposal needs a switched outlet under the sink, and the dishwasher needs a supply line, a drain line, and a cord path. Map all three before the first screw goes in.
Hardware that matters after installation
Soft-close hinges and full-extension drawer glides are standard on quality cabinets now. Both have adjustment screws for door alignment and drawer front tilt. Learn where they are before you install. Adjusting them after the countertop is on is much harder, and on a run of cabinets, one misaligned door throws off the visual line across the whole kitchen. Proper hardware selection prevents these issues from the outset, making the process of choosing cabinet hinges a critical step in ensuring your kitchen remains both functional and aesthetically balanced for years to come.
Conclusion
Every cabinet run has one moment that decides the whole job: setting the reference cabinet correctly. Get that right and everything after it is fastening, clamping, and small adjustments. Get it wrong and you'll spend the day chasing gaps that never close.
Frequently Asked Questions
Do base cabinets need to be attached to the floor?
Base cabinets do not need to be attached to the floor for structural stability. The weight of the cabinets, countertops, and contents holds them down. They are secured to the wall studs, which prevents tipping. Attaching to the floor can make future removal difficult and is not required by building codes for standard installations.
How do you join two base cabinets together during installation?
Clamp the face frames of adjacent cabinets together so they are flush. Drill pilot holes through the face frame of one cabinet into the other, then drive 1-1/4-inch cabinet screws to secure them. This creates a single, rigid unit. Pre-drilling prevents the wood from splitting and ensures a tight, aligned seam.
What is the best way to secure kitchen base cabinets to wall studs?
Locate wall studs with a stud finder and mark their centers. Drive 2-1/2-inch cabinet screws through the cabinet's hanging rail and the wall into the studs. Use at least two screws per stud. If a stud is not available, use heavy-duty toggle bolts. This fastening method provides the structural integrity needed to support the countertop and prevent movement.
How do you handle uneven floors when installing base cabinets?
Use wooden shims to fill gaps between the cabinet base and the floor. Place shims at the front and back of each cabinet, then check for level. Once level, score the shims with a utility knife and snap them off. For large gaps, use a continuous shim strip. This ensures the cabinet box is level and plumb, which is critical for door alignment and countertop fit.


