 833-377-8663

How to Install RTA Kitchen Cabinets: Step-by-Step Guide

Table of Contents
- How to Install RTA Kitchen Cabinets: Preparation and Planning
- Tools Needed for Cabinet Installation
- How to Level Kitchen Cabinets for Professional Results
- Step-by-Step: Assembling Your Cabinet Box and Face Frame
- How to Hang Wall Cabinets Securely
- Common Mistakes When Installing RTA Cabinets and How to Avoid Them
- Installing Base Cabinets and Integrating with Your Kitchen
- Conclusion
How to Install RTA Kitchen Cabinets: Step-by-Step Guide
Last Updated: July 9, 2026
Installing RTA kitchen cabinets can save thousands of dollars and transform your space in weeks. This guide walks you through every step, from preparation through final hardware adjustment, with practical tips that go beyond standard assembly manuals.
How to Install RTA Kitchen Cabinets: Preparation and Planning
Success depends on thorough preparation. Walk around your kitchen with a level and check multiple points along where cabinets will sit. Mark high and low spots with a pencil for reference during installation.
Create a detailed layout drawing showing cabinet arrangement, dimensions, door swing directions, and appliance locations. Measure each wall at three heights (top, middle, bottom) to catch irregularities. Document ceiling height, window locations, electrical outlets, and architectural features. Mark stud locations on your sketch, this is critical for secure fastening.
Assessing Your Space and Cabinet Layout
Most wall cabinets mount at 54 inches from the floor to the bottom of the cabinet, leaving 18 inches of clearance above for countertops. Use a stud finder to locate studs and mark them with painter's tape at the height where cabinet rails will attach.
Understanding Your RTA Cabinet Components
RTA cabinets arrive disassembled with cabinet panels (sides, top, bottom, and back), face frame pieces, and hardware. The cabinet box (carcass) forms the structural foundation. The face frame, the visible wooden frame surrounding the cabinet opening, attaches to the front. Back panels provide critical structural bracing.
Hardware includes dowel pins (wooden pegs that align panels), cam locks (rotating fasteners that tighten connections), hinges, drawer slides, and mounting rails. Lay out all components and verify everything against the packing list before beginning assembly.
If you're looking to customize your cabinet appearance beyond standard options, consider exploring Custom Order Inset or Custom Color Inset options, which allow you to tailor your cabinets to your exact design preferences before installation begins.
Tools Needed for Cabinet Installation
Essential Hand Tools and Power Tools
A cordless drill/driver is essential for driving fasteners and assembling components quickly. An 18-volt or 20-volt model provides sufficient power.
A 24-inch or 48-inch level is non-negotiable for checking cabinet alignment. A torpedo level (9-12 inches) works for tight spaces. A measuring tape, square, and pencil round out basic hand tools. A combination square helps verify 90-degree angles during assembly.
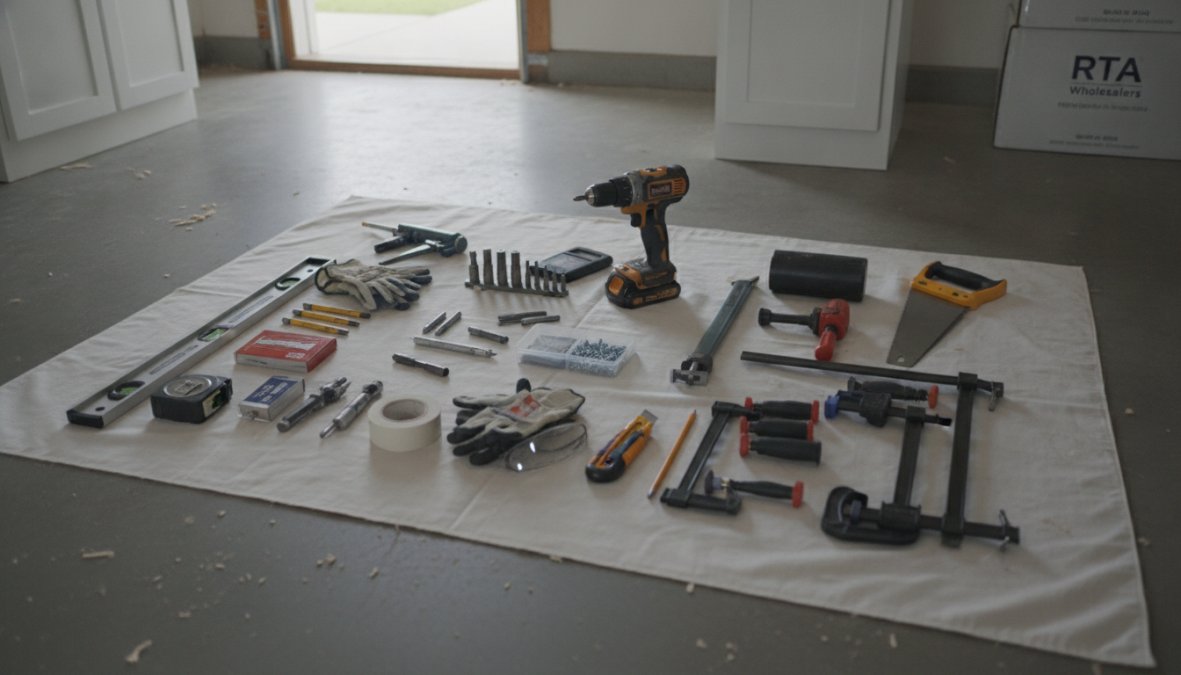
Clamps hold panels square during assembly. You'll need at least two C-clamps or bar clamps. A stud finder locates wall studs quickly. A rubber mallet gently drives dowel pins and cam locks without damaging wood.
Safety Equipment and Workspace Setup
Safety glasses, work gloves, and a dust mask protect you during work. Your workspace needs to be clean, well-lit, and organized. A large, flat surface like a workbench becomes your assembly station. Clear the floor of obstacles and trip hazards.
How to Level Kitchen Cabinets for Professional Results
Leveling determines installation success. Cabinets that aren't level look crooked, doors swing shut on their own, and drawers don't close properly.
Finding and Marking Studs
Wall studs provide anchor points for cabinet fasteners. Drywall alone cannot support cabinet weight. Use your stud finder to locate studs and mark their centers with painter's tape at the height where cabinet mounting rails will attach.
If studs don't align with your cabinet layout, install a horizontal mounting rail between studs, then attach cabinets to this rail. This distributes weight across multiple studs.
Using Shims and Leveling Techniques
Shims are thin wedges that fill gaps between cabinets and uneven walls. Set your first cabinet in place without fastening it. Use your level to check both horizontal and vertical alignment. Slide shims under the cabinet base until the level shows true level.
Once the first cabinet is level and shims are positioned, fasten it to wall studs using fasteners long enough to penetrate studs by at least one inch. Typically, 2.5-inch screws work well for wall cabinets.
For the second cabinet, position it tight against the first and check level again. Shim as needed to match the height of the first cabinet. Fasten to studs, then connect the two cabinets together using fasteners through the face frames.
Step-by-Step: Assembling Your Cabinet Box and Face Frame
Connecting Cabinet Panels with Dowel Pins and Cam Locks
Lay the side panels flat on your workspace with the interior facing up. Position the top and bottom panels between them, aligned with marked positions. Insert dowel pins into holes in the side panels. Apply wood glue to the dowel ends and mating surfaces. Slide the top and bottom panels onto the dowels, checking that corners form 90-degree angles.
Cam locks then tighten these connections. Position the bolt side first, then insert the cam. Rotate the cam 90 degrees with a screwdriver until snug. Don't over-tighten or you'll strip the threads.
Use your square to verify 90-degree angles before tightening all cam locks. Check diagonals: measure corner to opposite corner. Equal measurements mean the box is square.
Once the box is square and all cam locks are tight, attach the back panel. Fasten it with small fasteners spaced every 6 inches around the perimeter.
Attaching the Face Frame and Back Panel
Position the face frame pieces carefully, they must be perfectly aligned with the box edges. Use clamps to hold the frame in place while fasteners set. Pre-drill holes to prevent wood splitting. Use fasteners spaced 8-12 inches apart around the entire perimeter.
The back panel provides structural reinforcement and prevents the cabinet from racking or twisting under load. Fasten it with fasteners every 6 inches.
How to Hang Wall Cabinets Securely
Wall cabinet installation requires precision. The goal is getting cabinets level, plumb, and securely fastened to studs.
Installing Hanging Rails and Fasteners
Many cabinet systems use hanging rails, horizontal aluminum or steel rails that attach to wall studs. Install hanging rails at the exact height where cabinet bottoms will sit (typically 54 inches from floor). Use a level to ensure rails are perfectly horizontal. Fasten rails to studs with fasteners that penetrate at least one inch into the stud.
Before fully tightening fasteners, check level and alignment. Make micro-adjustments by loosening fasteners slightly and repositioning cabinets. Once everything aligns perfectly, tighten all fasteners securely.
One-Person Installation Techniques
A cabinet lift, a mechanical device that raises and holds cabinets at working height, transforms solo installation from frustrating to manageable. Cabinet lifts can be rented affordably.
Without a lift, build a simple frame from 2x4 lumber that holds cabinets at the correct height while you fasten them. Position the support, set the cabinet on it, level and align, then fasten to studs. Once secure, remove the support.
Common Mistakes When Installing RTA Cabinets and How to Avoid Them
The biggest mistake is skipping the leveling step or doing it carelessly. Uneven cabinets look wrong and function poorly. Take time to level each cabinet individually and check that adjacent cabinets are level with each other.
Another frequent error is fastening to drywall instead of studs. Drywall cannot support cabinet weight long-term. Always locate studs and fasten into them. If studs don't align with your layout, install mounting rails between studs.
Assembling cabinets before understanding the layout causes problems. Always verify your cabinet placement and orientation before assembly begins.
Overtightening cam locks strips the threads and damages the connection. Cam locks only need to be snug. Stop tightening when you feel resistance.
Not checking for square during assembly means your cabinet box won't be square, causing door and drawer issues later. Use a square to verify 90-degree angles before tightening cam locks.
Structural Integrity and Post-Assembly Reinforcement
Add additional fasteners at connection points for long-term durability. If your cam lock assembly uses one fastener per connection, add a second fastener offset from the first.
For base cabinets that will hold heavy items, add internal bracing. Diagonal bracing between the top and bottom panels prevents racking. Use wooden strips glued and fastened at 45-degree angles inside the cabinet box.
A well-fastened back panel is your cabinet's primary defense against racking. Use fasteners every 6 inches around the entire perimeter. Consider adding fasteners to the interior as well.
Connect adjacent cabinets securely through their face frames using fasteners spaced 12 inches apart vertically and horizontally. This creates a unified structure that distributes loads across multiple cabinets.
Installing Base Cabinets and Integrating with Your Kitchen
Position base cabinets along the wall, checking level as you go. Shim under the cabinets to achieve level. Connect base cabinets to each other through their face frames, creating a unified base structure. Once all base cabinets are level and connected, you're ready for countertop installation.
Drawer Slides, Hinges, and Hardware Adjustment
Install drawer slides according to your cabinet's specifications, typically mounting them 1.75 inches from the top and bottom of the opening. Position slides carefully, even small misalignments cause binding or tilting. Pre-drill holes to prevent wood splitting.
Hinges mount on the back of cabinet doors and the inside of the face frame. Adjust hinges to ensure doors hang straight and close properly. Most hinges allow adjustment in three directions: up/down, left/right, and in/out. Make small adjustments and test door operation frequently.
After everything is installed, walk through your kitchen opening and closing doors, sliding drawers, and checking alignment. Make fine adjustments to hinges as needed. If you've chosen a specialty option like Special Order Oak Inset Kitchen Cabinets, pay particular attention to how the wood grain and finish align across cabinet doors and frames for a cohesive appearance.
| Installation Phase | Key Focus | Common Issue | Solution |
|---|---|---|---|
| Preparation | Wall assessment, layout planning | Uneven walls not identified | Measure at multiple points, mark high/low spots |
| Assembly | Cabinet box square, face frame aligned | Crooked box, misaligned doors | Use square during assembly, verify diagonals |
| Wall Mounting | Level and plumb installation | Uneven cabinets, fastener failure | Shim properly, fasten only to studs |
| Hardware | Drawer and door operation | Binding drawers, misaligned doors | Install slides carefully, adjust hinges precisely |
| Reinforcement | Long-term structural integrity | Cabinet racking, joint failure | Add extra fasteners, reinforce back panel |
Installing RTA kitchen cabinets transforms your kitchen without the cost of custom cabinetry or lengthy timelines. The real challenge lies in proper preparation and attention to detail during assembly and leveling. Take your time with leveling and structural reinforcement, and your cabinets will deliver professional results that last for decades.
Frequently Asked Questions
Is it hard to install RTA kitchen cabinets?
Installing RTA cabinets is manageable for DIYers with basic tool skills. The difficulty depends on your comfort with assembly and your kitchen layout. Ready-to-assemble cabinets come with pre-drilled holes and hardware, which simplifies the process significantly. Most homeowners find that careful planning, the right tools, and following assembly instructions step-by-step makes the project achievable. One-person installation is possible with proper support techniques and patience.
What tools do I need to install RTA kitchen cabinets?
Essential tools include a drill/driver, level, measuring tape, clamps, square, rubber mallet, and a stud finder. You'll also need fasteners, wood glue, and shims for leveling. A circular saw or miter saw helps with minor cuts if needed. Having a helper or temporary support system is valuable for hanging wall cabinets, though one-person techniques exist. Quality tools ensure proper cabinet alignment and structural integrity throughout installation.
Should I install wall or base cabinets first?
Install base cabinets first. This provides a stable foundation and reference point for measuring wall cabinet height. Base cabinets are easier to level and secure since they rest on the floor. Once base cabinets are installed and leveled, you can accurately measure and install wall cabinets above them. This sequence prevents misalignment and ensures proper spacing between base and wall cabinet units for countertops and backsplash work.
How long does it take to install RTA kitchen cabinets?
A full kitchen of RTA cabinets typically takes 2-5 days for an experienced DIYer, depending on cabinet quantity and kitchen complexity. Assembly time varies by cabinet type and whether you're working alone or with a helper. Wall cabinets require more careful leveling and hanging, which extends the timeline. Budget extra time for measuring, marking studs, and making adjustments to ensure proper cabinet alignment and structural integrity. Professional installation may be faster but varies by region.


