 833-377-8663

How to Maintain Inset Cabinet Door Alignment

Table of Contents
- Why Inset Cabinet Door Alignment Matters
- Tools You'll Need for Cabinet Maintenance
- Understanding Inset Cabinet Hinge Mechanics
- Step-by-Step Inset Cabinet Hinge Adjustment Guide
- Troubleshooting Rubbing, Grinding, and Sagging Doors
- Common Mistakes to Avoid
- Maintaining Alignment Long-Term
- Conclusion
Last Updated: August 17, 2026
Why Inset Cabinet Door Alignment Matters
Inset cabinet doors sit flush within the cabinet frame, creating a seamless, built-in appearance that defines high-end cabinetry. Unlike overlay doors that sit on top of the frame, inset doors demand precision, they have nowhere to hide. The gap of just 1/8 inch is a determining detail of perfection, and a door that rubs or doesn't close smoothly undermines the entire look of the installation.
Choose a quality inset cabinets to avoid long term problems with door alignment.
Maintaining proper inset cabinet door alignment is really a simple task. The good news: alignment adjustments are straightforward once you understand how inset hinges work. Most issues can be handled upon installation and corrected with a little care and with basic hand tools and a few minutes of work.
Tools You'll Need for Cabinet Adjustment
Essential Hand Tools
A Phillips head screwdriver is your primary adjustment tool for most inset hinges. A magnetic screwdriver prevents screws from dropping into the cabinet cavity. A drill-driver with adjustable torque settings helps when installing new hinges or tightening fasteners without stripping screw heads.
A 2-foot torpedo-style level reveals whether doors sit perfectly vertical and fits into tight spaces between cabinet boxes. A tape measure documents gap sizes before and after adjustment, showing whether adjustments are moving in the right direction. The ultimate tool for adjusting the doors and drawers is a keen eye or vision correction eyeglasses.
Measurement and Diagnostic Tools
A straightedge, such as a 24-inch aluminum ruler, reveals gaps between the door and frame by showing light where misalignment exists. A feeler gauge set measures gaps with precision. A marking pen tracks which hinge you've modified and by how much. A small flashlight illuminates the hinge mechanism inside the cabinet, making adjustment screws visible and accessible.
Understanding Inset Cabinet Hinge Mechanics
How Hinges Control Door Position
Inset cabinet doors rely on cup hinges, where the hinge cup sits in a drilled hole on the back of the door and the mounting plate attaches to the inside of the cabinet frame. Screws on the mounting plate shift the hinge arm in three directions, repositioning it to move the door without bending the hinge or forcing it.
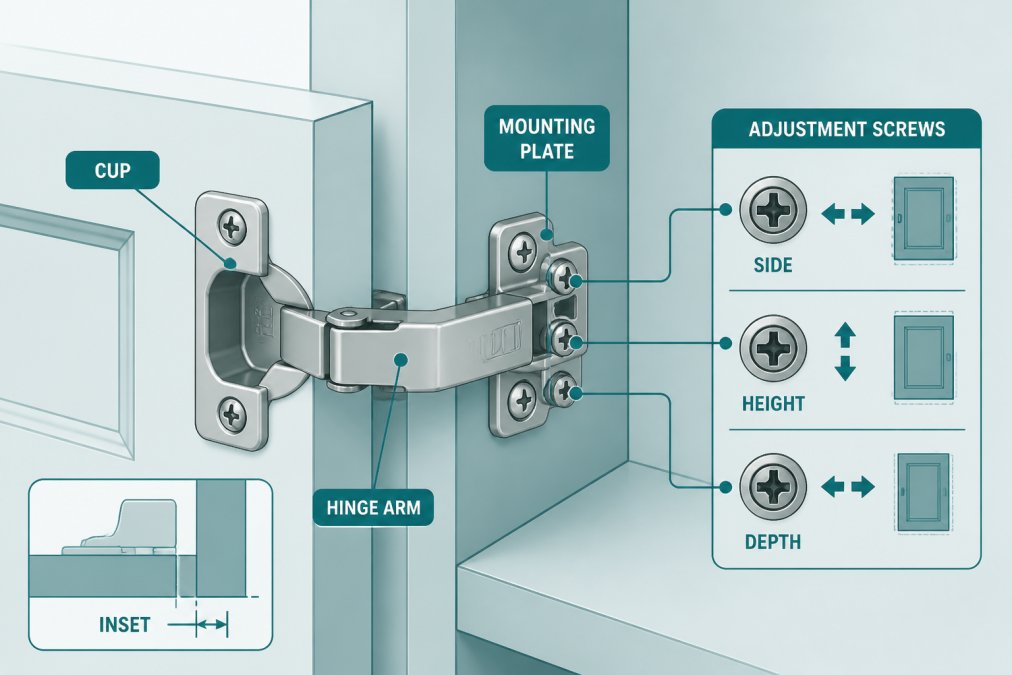
Most inset hinges have three adjustment screws on the mounting plate, each controlling movement in one direction.
The Three Planes of Adjustment
Vertical adjustment (height): The screw furthest from the door hinge cup adjusts the door up or down. Turning clockwise raises the door; counterclockwise lowers it. This is the most frequently used adjustment. Many hinges rely on the initial installation of the hinge and require a simple spacing gauge like a coin or ice cream stich to adjust for the correct height.
Lateral adjustment (side-to-side): The screw closest to the cabinet frame adjusts the door left or right, correcting uneven reveals between the door and frame.
Depth adjustment (front-to-back): The third screw, typically on the side of the mounting plate, moves the door toward or away from the cabinet frame, correcting rubbing or gaps.
Many alignment issues involve more than one plane. Understanding which screw does what prevents frustration and saves time. You will quickly get the movement of the doors understood and be able to adjust the doors without a challenge.
Step-by-Step Inset Cabinet Hinge Adjustment Guide
Step 1: Inspect the Frame and Identify Problem Areas
Open the cabinet door fully and examine the reveal, the gap between the door edge and the cabinet frame. The reveal should be consistent on all sides, typically 1/16 inch to 3/32 inch.
Use a straightedge to identify which edges are flush and which are proud. Close the door gently and listen for binding, scraping, or resistance. Measure the gap at the top and bottom of the door on the hinge side to document misalignment before adjusting.
Stand in front of the cabinet and determine the gap is even all the way around. Your eyes will be the best judge of the correct spacing.
** Make sure your door bumpers are installed before any adjustments are made. It is best to apply a temporary masking tape handle to be able to open the inset door. Using a ridgid credit card between the door frame and center panel helps to open the door without tape or handle installed.
Step 2: Adjust Vertical Alignment (Height)
Locate the vertical adjustment screw on the bottom hinge, typically the screw furthest from the hinge cup. Turn it clockwise in quarter-turn increments to raise the door. After each quarter-turn, close the door gently and observe the reveal. Most cabinets will require raising or lowering of the hinge connection to the cabinet. When installing place your spacer under the door at the face frame and center your mounting screw. A screw installed too close to the top or bottom may require resetting of the screw to raise or lower the door.
Pro tip - The ice cream stick will get your cabinet door very close to the final installation height. Secure the hinge in the middle of the oblong screw hole to allow small adjustments of raising or lowering.
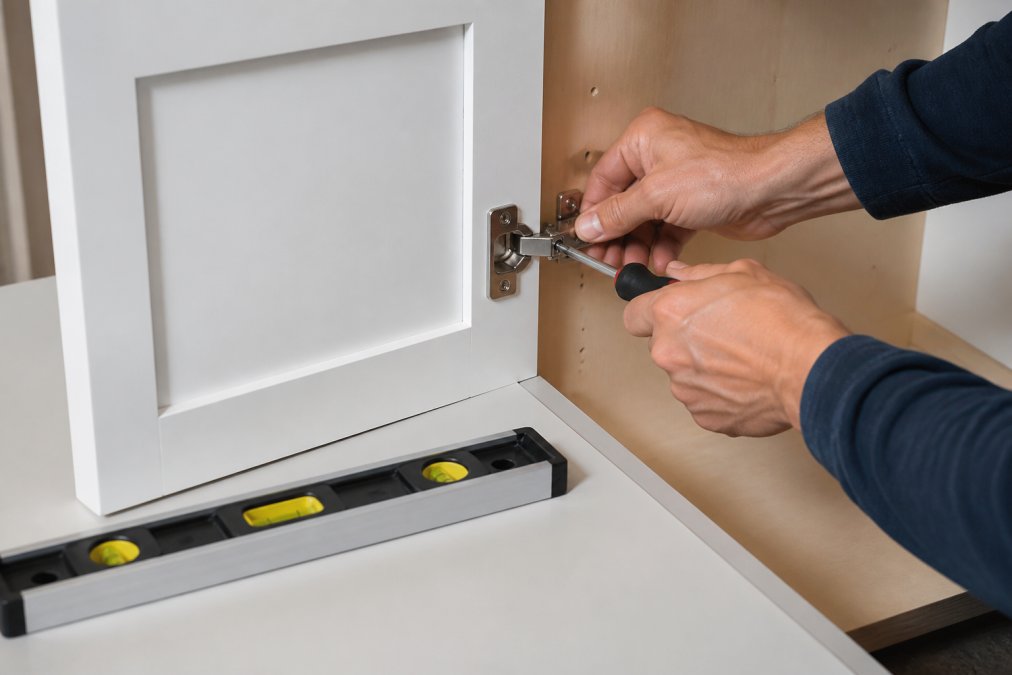
If the bottom gap is too large, adjust the bottom hinge downward by turning counterclockwise. If the top gap is too large, adjust the top hinge upward. Once the door sits level, measure the overall gap between the top of the door and the top of the frame. If this gap needs adjustment, turn the vertical screw on both hinges equally to raise or lower the entire door without tilting it.
Use a level on top of the door to verify vertical alignment. Again- visual inspection rules here and your eyes will be the best tool for judging correctness.
Step 3: Adjust Lateral Alignment (Side-to-Side)
Check the left-to-right reveals. The gap between the left edge of the door and the left side of the frame should match the gap on the right side.
Locate the lateral adjustment screw on each hinge, typically closest to the cabinet frame. If the door is too far to the left, turn the lateral screw on both hinges clockwise to move the door right. If too far right, turn counterclockwise. Adjust both hinges equally to avoid tilting the door.
Step 4: Adjust Depth (Front-to-Back)
Locate the depth adjustment screw, usually on the side of the mounting plate. If the door is rubbing on the frame, turn this screw to move the door forward. If the door is sitting too far back inside the cabinet, turn the screw to move it closer to the frame. Make small adjustments and test the door movement.
Holding a credit card or straight edge at an angle from side face frame to horizontal face frame will show you if door is recessed into opening or sitting proud of the opening.
Troubleshooting Rubbing, Grinding, and Sagging Doors
Preventing Cabinet Door Sagging Over Time
The primary cause of sagging is loose hinge fasteners (screws). Check all hinge screws, both adjustment screws and mounting screws, tighten any that have loosened. Use fasteners rated for cabinet work, such as self-locking screws or those with thread-locking compound. It is best to use your hand to best tell for tightness without over screwing and damaging the wood. A power driver should be set a a lower setting and increased to a higher setting to ensure you do not strip out the hole. A power driver can easily damage the wood when setting the screws.
For doors wider than 24 inches or heavier than 15 pounds, doors will come with a third hinge in the middle to distribute the load.
Hinge Maintenance and Lubrication
Use a soft brush or compressed air to remove dust from the hinge cup and mounting plate. Don't use water or liquid cleaners.
Lubricate hinges with silicone spray applied to the hinge pin and connection point. Wipe away excess oil immediately to prevent dust accumulation. For soft-close hinges, consult the manufacturer's instructions if the damper cartridge needs adjustment or replacement.
Common Mistakes to Avoid
Making large adjustments without measuring creates new problems. Always measure or close the door and view straight on before and after adjustments, using quarter-turn increments. If you've turned a screw more than two full rotations without improvement, stop and reassess, you may be adjusting the wrong screw.
Adjusting only one hinge when the problem affects the entire door is a common error. Vertical misalignment often requires adjusting both hinges equally. Over-tightening adjustment screws strips threads in the mounting plate. Turn screws firmly but not forcefully.
Ignoring frame issues causes endless frustration. Check the frame with a level and straightedge before blaming the hinges. Neglecting fastener maintenance allows hinges to loosen, undoing your adjustments.
Maintaining Alignment Long-Term
Inset cabinet door alignment requires little care once installed. Seasonal humidity changes can cause wood to expand and contract on wood that is not seasoned, affecting alignment. Check doors every season and make minor adjustments if needed. You will want your doors to always look just right
Maintain consistent humidity in your home. Wood movement is greatest in environments with large humidity swings. Keep hinges clean and lubricated with a few minutes of maintenance if a door ever seems out of alignment. Good quality inset cabinets will require little or no adjustments over time.
When you invest in quality construction from the start, maintenance becomes simpler and alignment stays stable longer and may never need readjustment. Options like Custom Order Inset cabinets and Special Order Oak Inset Kitchen Cabinets are built with precision that makes long-term alignment easier from day one.
Frequently Asked Questions
Why do inset cabinet doors go out of alignment?
Inset cabinet doors lose alignment due to settling of the cabinet frame, loose hinge fasteners, humidity fluctuations affecting wood expansion, or wear on the hinge mechanism itself. Unlike overlay doors, inset doors sit flush within the frame, so even small shifts in the cabinet box or hinge tension become visible. Regular inspection of adjustment screws and hinges prevents most alignment issues before they become noticeable.
How often should I adjust my kitchen cabinet hinges?
Check inset cabinet hinge alignment twice yearly, typically after seasonal changes when wood expansion and contraction are most active. More frequent checks are needed in the first year after installation as the cabinet frame settles. If you notice doors rubbing, gaps widening, or handles becoming difficult to reach, adjust immediately rather than waiting for a scheduled maintenance window. Soft-close hinges may need tension adjustments every 2-3 years depending on usage.
Can humidity affect inset cabinet door alignment?
Yes, humidity significantly impacts inset cabinet alignment because wood expands when moisture increases and contracts when it decreases. Inset doors are particularly sensitive because they sit within a precise reveal. High humidity can cause doors to swell and rub against the frame, while dry conditions may create visible gaps. Maintaining consistent indoor humidity between 35-55% reduces alignment drift. If you live in a humid climate, expect to make minor adjustments seasonally.
What tools do I need to adjust inset cabinet hinges?
You'll need a Phillips head screwdriver for most adjustment screws, a level to verify vertical alignment, and a straightedge or ruler to measure reveal gaps. A flashlight helps inspect hinge mechanics in dark cabinet interiors. Some hinges require a hex wrench or Torx driver, so check your specific hinge type before starting. A small container of silicone-based lubricant is useful for maintaining hinge smoothness. These basic tools are affordable and essential for any cabinet maintenance work.


