 833-377-8663

Kitchen Floor Plan Templates for Home Renovation

Table of Contents
- Kitchen Floor Plan Templates: The Foundation of Your Renovation
- The Kitchen Work Triangle Rules That Define Efficient Layouts
- Five Essential Kitchen Layout Types and When to Use Each
- Small Kitchen Floor Plan Ideas That Maximize Limited Space
- Kitchen Layout Design Software and Planning Tools
- Kitchen Renovation Planning Checklist: Measuring and Constraints
- Accessibility and Universal Design Considerations
- Electrical, Plumbing, and Lighting Integration in Your Floor Plan
Last Updated: August 6, 2026
Kitchen Floor Plan Templates: The Foundation of Your Renovation
A well-designed kitchen floor plan determines workflow efficiency, storage capacity, appliance placement, and how functional your kitchen becomes for daily use. Kitchen floor plan templates give you a starting point to visualize your space before committing to cabinetry or structural changes. Rather than guessing, you're working from proven layouts that thousands of kitchens have validated.
This guide walks you through essential kitchen floor plan templates, the rules that make layouts work, and practical constraints you need to measure before ordering cabinets or appliances.
The Kitchen Work Triangle Rules That Define Efficient Layouts
The kitchen work triangle connects three primary work zones: the cooking station (range or cooktop), the prep area (sink and counter space), and the cleaning zone (refrigerator). The distances between these three points determine traffic flow and efficiency.
The ideal kitchen work triangle has sides measuring between 4 and 9 feet, with a perimeter totaling no more than 26 feet. When distances fall within this range, you spend less time walking between tasks. If your triangle stretches too far, you're wasting steps on every meal.
Modern kitchens often break the pure triangle rule, especially with islands or peninsulas. What matters most is that your three zones remain reasonably accessible without crossing through high-traffic areas. A kitchen island can improve your triangle by creating a secondary prep zone that shortens distances.
Common mistakes include placing the refrigerator too far from the sink, positioning the stove directly across from a main walkway (creating safety issues), or clustering all three zones so tightly that multiple people can't work simultaneously. The work triangle is a guideline that helps you catch these problems before construction begins.
Five Essential Kitchen Layout Types and When to Use Each
Kitchen layouts fall into five primary categories, each with distinct advantages and constraints.
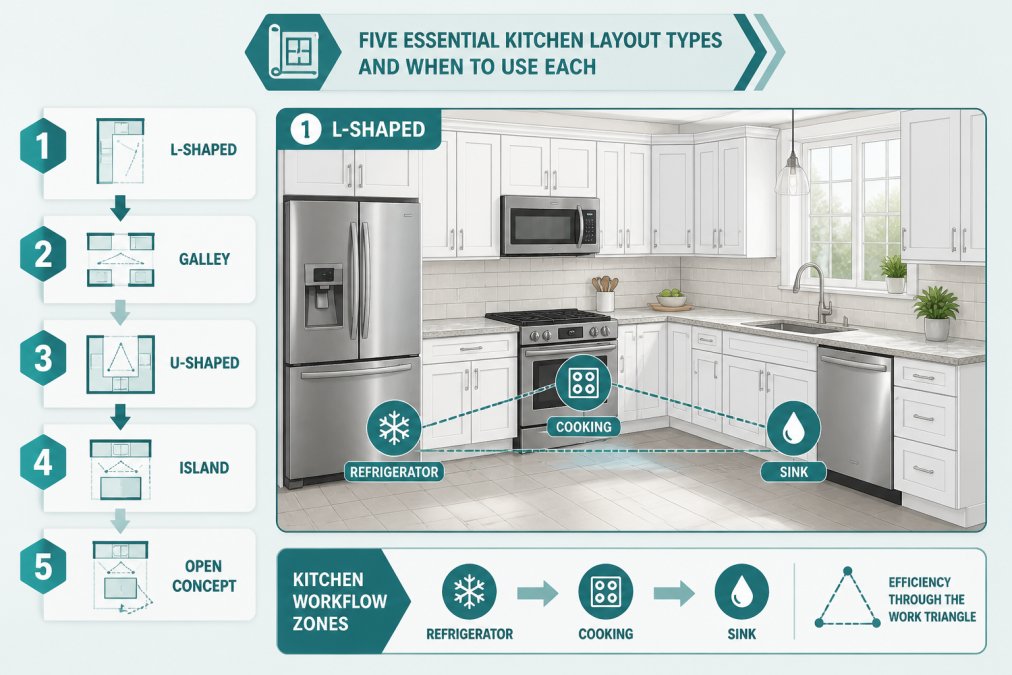
L-Shaped Layouts
An L-shaped kitchen uses two perpendicular walls, creating an efficient work triangle with minimal wasted space. This layout works well in open-concept homes because it naturally defines the kitchen zone without enclosing the entire space. One wall typically houses the range and primary prep area, while the adjacent wall holds the sink and refrigerator.
L-shaped layouts maximize corner space and provide good counter continuity. Modern corner solutions like lazy Susans or pull-out organizers have largely solved accessibility issues. You get roughly 25-30 linear feet of cabinetry in a standard L-shape, which suits most residential kitchens.
U-Shaped Layouts
U-shaped kitchens wrap cabinetry around three walls, creating maximum storage and counter space. This layout excels in dedicated kitchen spaces where you have room to spread out. Each work zone gets its own dedicated area: one wall for cooking, another for prep, and a third for cleanup and storage.
U-shaped layouts can accommodate 40+ linear feet of cabinetry, making them ideal for larger families or frequent cooks. You need at least 8 feet between opposite walls to avoid feeling boxed in. This layout works best in kitchens with dedicated space, not open-concept designs.
Galley Kitchens
A galley kitchen runs along two parallel walls, creating a narrow, efficient corridor. This layout is standard in apartments, smaller homes, and older houses where kitchen space is limited. Everything is within arm's reach, making galley kitchens highly functional despite their compact footprint.
The primary constraint is that two people working simultaneously creates friction. A galley works best when it's a dedicated space with entry points at both ends, allowing traffic to pass through without disrupting cooking. Custom Order Inset cabinetry fits galley spaces precisely, eliminating wasted gaps that plague standard-size cabinet installations.
One-Wall Kitchens
A one-wall kitchen places all cabinetry, appliances, and counter space along a single wall. This layout is common in studio apartments, tiny homes, and open-concept lofts. One-wall kitchens are the most space-efficient layout available.
The trade-off is that your work triangle compresses into a line, limiting simultaneous cooking. One-wall kitchens work best for single occupants or couples who don't cook together frequently. Vertical storage, corner organizers, and thoughtful appliance selection maximize usable space.
Island and Peninsula Configurations
Islands and peninsulas add a secondary work zone to any layout, effectively creating a second prep area and improving your work triangle. An island is a freestanding counter; a peninsula is attached to an existing wall or cabinetry.
Islands work best in kitchens with at least 150 square feet of total space and at least 10 feet of clearance on all sides. A peninsula requires less space and works in smaller kitchens where a full island would feel cramped. Both configurations add seating, storage, and visual interest.
The main consideration is traffic flow. An island in the wrong position can block the path between key work zones. Islands also require electrical and plumbing runs underneath, which adds cost and complexity.
Small Kitchen Floor Plan Ideas That Maximize Limited Space
Small kitchens require strategic planning because every square foot must earn its place. Start by measuring your exact footprint and identifying immovable constraints: windows, doors, load-bearing walls, existing plumbing, and electrical outlets.
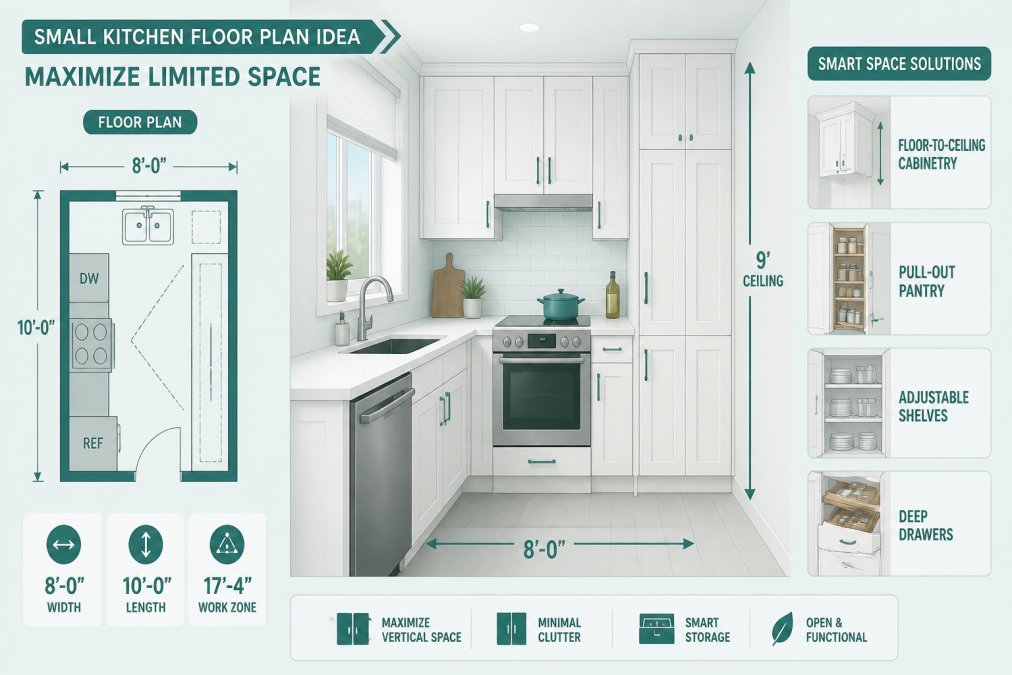
Vertical storage becomes critical in small spaces. Build upward instead of outward. Floor-to-ceiling cabinets maximize storage without consuming more floor space. Open shelving above the counter can work, but it requires discipline; visible clutter makes small kitchens feel even more cramped.
Consider a galley or one-wall layout if you have limited square footage. Avoid islands in kitchens under 100 square feet; they consume valuable floor space without providing enough benefit.
Corner cabinets deserve special attention in small kitchens. Lazy Susan organizers, pull-out corner drawers, and diagonal cabinet configurations all improve corner accessibility. Custom Color Inset cabinetry allows you to design corners that actually work for your specific layout while matching your exact color preferences.
Appliance selection matters more in small kitchens. A counter-depth refrigerator saves 6 inches of depth and feels less imposing than a full-size model. Compact ranges, combination microwave-convection ovens, and drawer-style dishwashers all reduce the visual footprint while maintaining functionality.
Lighting transforms small kitchens. A single overhead light creates shadows and makes the space feel darker and smaller. Under-cabinet lighting, pendant lights over a counter, and recessed fixtures throughout brighten the space and make it feel larger.
Kitchen Layout Design Software and Planning Tools
Visualizing your kitchen floor plan before construction prevents costly mistakes. Free online tools like Floorplanner and RoomSketcher let you input room dimensions and place furniture and appliances, giving you a 2D bird's-eye view of your space.
Professional design software like SketchUp and Home Depot's kitchen planner offer 3D visualization, material libraries, and the ability to see how your kitchen looks from different angles. These tools help you catch spatial issues before ordering cabinetry.
Many cabinet manufacturers offer free kitchen design services that go beyond generic software. A designer reviews your specific space, understands your workflow, and creates a custom floor plan tailored to your layout and cabinetry choices. This service catches mistakes that software alone might miss: plumbing constraints, electrical requirements, and how your chosen cabinets actually fit your dimensions.
The best approach combines software exploration with professional design input. Use software to explore ideas, then work with a designer to refine the plan and catch real-world constraints before you order materials.
Kitchen Renovation Planning Checklist: Measuring and Constraints
A detailed kitchen renovation planning checklist ensures you capture every measurement and constraint before finalizing your floor plan.
| Measurement/Constraint | Why It Matters | What to Note |
|---|---|---|
| Exact room dimensions (length, width, ceiling height) | Determines maximum cabinetry size and layout options | Measure in multiple spots, walls aren't always square |
| Door swing direction and clearance | Affects appliance and cabinet placement | Mark swing radius on your floor plan |
| Window locations and sill heights | Determines counter and cabinet placement above windows | Note if windows are fixed or operable |
| Existing plumbing locations | Sink placement is constrained by existing drain and supply lines | Design around existing plumbing when possible |
| Electrical outlets and switch locations | Appliance placement depends on available power | Note voltage requirements for range and dishwasher |
| Load-bearing walls | You cannot remove these without structural support | Identify before planning your layout |
| Ceiling height variations | Affects upper cabinet installation and clearance | Note if ceiling is sloped, vaulted, or has beams |
| Appliance dimensions | Cabinet layout must accommodate your appliances | Include depth, width, and height for range, refrigerator, dishwasher |
| Traffic patterns | High-traffic areas should stay clear of work zones | Identify main pathways through and around the kitchen |
Measure twice, three times if necessary. Use a laser measure for accuracy; tape measures introduce more error in longer distances. Photograph your existing kitchen from multiple angles and note anything unusual: uneven walls, odd angles, or structural elements that constrain your design.
Identify which constraints are fixed and which are flexible. Plumbing and electrical are expensive to move, so design your layout around existing locations when possible. Load-bearing walls cannot move at all. Appliances can be swapped for different sizes, and cabinetry can be custom-sized to fit your exact space.
Document any structural issues: water damage, rot, uneven floors, or cracked walls. These need repair before you install new cabinetry.
Accessibility and Universal Design Considerations
Universal design principles make kitchens functional for people of all ages and abilities. Even if accessibility isn't your immediate concern, building in universal design features improves usability for guests, aging in place, and resale appeal.
Counter height is the first consideration. Standard counters are 36 inches high. Lowering a section to 34 inches accommodates wheelchair users and shorter individuals. Varying counter heights throughout your kitchen improves usability for everyone.
Knee space under the sink, a recessed area that allows wheelchair access or lets you sit while working, transforms functionality. Even 15 inches of recessed space under a standard sink makes a difference.
Cabinet hardware matters more than many realize. D-shaped pulls are easier to grip than small knobs, especially for people with arthritis or limited hand strength. Soft-close drawers prevent pinched fingers and reduce noise.
Appliance placement affects accessibility. Side-by-side refrigerators are easier to access than top-freezer models. Wall-mounted ovens at waist height are safer and more accessible than floor ovens. A cooktop with front controls prevents reaching over hot surfaces.
Lighting is essential for accessibility. Bright, even lighting reduces falls and makes it easier to see what you're doing. Under-cabinet lighting illuminates counters where you're working. Pendant lights or recessed fixtures provide general illumination without creating shadows.
Flooring should be non-slip and level. Transitions between rooms should be smooth and gradual, not abrupt steps.
These features make kitchens more pleasant and functional for everyone, not just those with accessibility needs.
Electrical, Plumbing, and Lighting Integration in Your Floor Plan
Your floor plan must account for electrical, plumbing, and lighting from the start. These systems are expensive to modify after cabinetry is installed.
Electrical requirements begin with understanding what you're powering. A range requires a dedicated 240-volt circuit; a dishwasher and microwave each need their own 20-amp circuits. Countertop outlets should be spaced no more than 4 feet apart. Identify existing outlet locations and plan your layout around them when possible. If you must relocate outlets, budget for an electrician.
Plumbing constraints are significant. Your sink must connect to existing drain and supply lines. Moving a sink more than a few feet requires rerouting plumbing, which is expensive. If your floor plan requires the sink in a new location, get a plumber's estimate early.
An island or peninsula sink requires plumbing runs underneath. Supply and drain lines must drop through the floor or run along the underside of the island. Plan for this complexity in your budget.
Lighting should be layered: ambient (general illumination), task (focused light where you work), and accent (decorative). Ambient light might come from recessed ceiling fixtures. Task lighting, under-cabinet strips and pendant lights over a counter, illuminates where you actually work.
Under-cabinet lighting is one of the highest-impact upgrades. It illuminates your work surface and makes the kitchen feel brighter overall. LED strips are energy-efficient and generate minimal heat.
A dimmer switch for your main lighting gives you flexibility: bright light for cooking, dimmer for dining or entertaining.
Work with your electrician and plumber early in the planning process. They can identify constraints, suggest solutions, and provide cost estimates. A professional kitchen designer understands these constraints and designs layouts that work within real-world limitations.
A kitchen floor plan is the blueprint for everything that follows. Measure precisely, understand your constraints, and explore layouts that match your space and how you actually cook. The time you invest in planning prevents expensive mistakes and ensures your renovation delivers a kitchen that's both beautiful and genuinely functional. Start with your measurements and layout, then work with a designer to turn your floor plan into a kitchen that works. Inset cabinets available in custom sizes and custom colors offer flexibility to fit any layout precisely.
Frequently Asked Questions
What is the most efficient kitchen floor plan template?
The most efficient kitchen floor plan depends on your space and workflow, but the L-shaped and U-shaped layouts consistently deliver strong functionality. Both organize the sink, stove, and refrigerator into a logical work triangle while maximizing counter and storage space. For apartments or smaller homes, galley kitchens and one-wall layouts work well. The key is ensuring your appliances, prep areas, and cleaning zones follow the work triangle rule, keeping the three points within 26 feet of combined distance to minimize wasted steps during meal preparation.
How do I measure my kitchen for a floor plan template?
Start by measuring the length and width of your kitchen in feet, then note the exact location of windows, doors, and existing utilities like outlets and plumbing. Measure from corner to corner diagonally to verify square footage. Document appliance locations, cabinet positions, and any architectural features like load-bearing walls or soffits. Photograph the space from multiple angles. If you're planning a major renovation, note ceiling height and any clearance constraints. Having accurate measurements prevents costly mistakes and ensures your chosen layout actually fits your space before ordering cabinetry or scheduling installation.
Are there free tools to design a kitchen floor plan?
Yes, several free options exist for basic kitchen floor planning. Online tools let you input dimensions and drag-and-drop cabinetry and appliances into your layout. Many home improvement retailers offer free design consultations that include floor plan creation. For a more detailed, professional approach, consider RTA Wholesalers' free kitchen design service, which helps verify your measurements and layout choices before you order materials. This service catches potential errors early and ensures your renovation stays on track, especially valuable for DIY projects where mistakes can derail timelines and budgets.
What are standard dimensions for kitchen aisles and walkways?
Standard kitchen aisles should be at least 36 inches wide for one person to work comfortably, and 42-48 inches wide if two people need to pass each other. Main walkways through the kitchen should be 36-42 inches minimum. Counter depth is typically 24-25 inches, and countertop height is 36 inches (or 34-36 inches for accessibility). Appliances need clearance space: refrigerators need 1-2 inches on sides, ovens need 15-18 inches of counter space on one side, and dishwashers need 24 inches of clearance when open. These dimensions ensure safe, functional movement and prevent bottlenecks during meal prep.


